Making a room reservation on Avila’s campus
Ad Astra is our new campus room reservation system. Please review the quick start guide before logging in.
Ad Astra Quick Start Guide for Avila Faculty & Staff
Logging-In for the First Time
You won’t be able to access the full range of features in Ad Astra when you first log in. Follow the below steps to gain full access to Ad Astra.
- Enter the following URL into your preferred web browser: https://www.aaiscloud.com/AvilaU
- Log into our institutional site using your Single-Sign-On username and password (the same username@avila.edu and password you use to log into your email account when off-campus)

3. Immediately log out again. Your current permissions are the permissions that students who may log in will have.
- In the top right corner, click your username
- Click the “sign out” option that appears

4. You will likely for the time being receive an error on sign-out. We are currently working with Ad Astra to resolve this issue. In the meantime, you will need to completely close all browser windows to complete the sign-out process. If you don’t completely sign out, your permissions will not update.
5. Send an email to taylor.mankin@avila.edu informing them that you have signed into Ad Astra for the first time.
6. Taylor will email you when your permissions are updated. At that point, you may log in as you did in steps 1 and 2 to gain full access to Ad Astra.
Basic Features in Ad Astra
We will continue to refine our Ad Astra website with new features, but for our initial launch, we are focusing on two major pieces:
- Direct Scheduling
- Event/Resource Request Forms
Special groups within faculty and staff will receive additional training to make the most of some of the more advanced features available now through Ad Astra.
Direct Scheduling
With Ad Astra access, faculty and staff have the ability to directly schedule an open conference room space for any meetings they may wish to have.
Any reservations pertaining to the Goppert Theatre and related rooms must be sent to Matt Schwader Harbor or John Rohr for approval.
If the event has specific resource requirements – such as a specific table/chair layout or audio/visual equipment setups – then the next section on Event/Resource Request Forms is the best place to go.
To directly schedule a conference room, click on Calendars in the top menu and select “Scheduling Grids” from the dropdown.
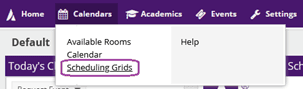
This brings up the full list of rooms on campus, but we have created a filter to easily allow for booking of conference rooms. Please change the dropdown option for “Choose Calendar” to “Conference Rooms.”

In the “Date” box, the date of the event can be entered to go directly to that date. From there, you can select the box for the time you would like to have your event.

Clicking on the box brings up the “Create Event” window where you will finish filling out the information for your event.
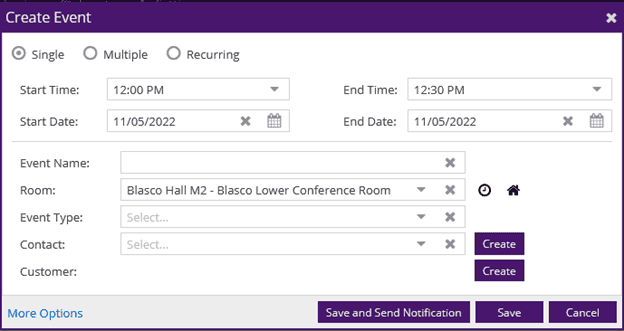
Start Time/End Time: These will be filled in for you based on where you clicked on the scheduling grid. Adjust as necessary.
Start Date/End Date: These will be filled in based on the date you chose on the scheduling grid. Adjust as necessary
Event Name: You must include a name for the event/meeting
Room: This is pulled from where you selected on the scheduling grid
Event Type: Please select the event type that most closely matches your event/meeting.
Contact: Start typing your last name, and a list of matching names will come up. Select your name from the list. If your name does not come up, please contact taylor.mankin@avila.edu for assistance.
Customer: This is associated with your name as the Contact for the event/meeting. You should not have to select this.
Click Save: Your event will show on the scheduling grid in green.
Your space in that conference room is now reserved!
Event/Resource Request Forms
If you need a space that isn’t a conference room, or if you need to request additional resources (like a/v equipment, banners, etc), you will need to complete one of the event request forms.
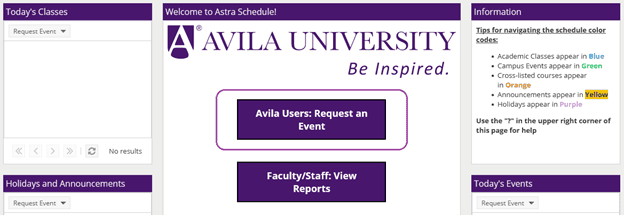
On the homepage of Astra Schedule, click the purple button that says “Avila Users: Request an Event”
This will bring up the Event Request Wizard.
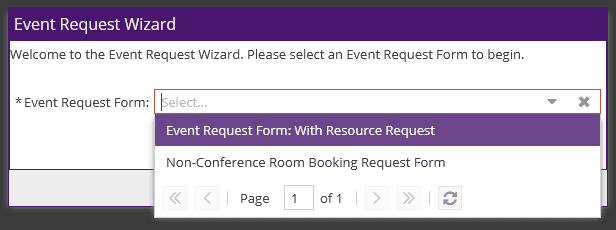
There are two options for the Event Request Form:
- Event Request Form: With Resource Request – use this form for any event that will require additional resources
- Non-Conference Room Booking Request Form – use this form for requesting any non-conference-room space for meetings/events that do not require additional resources
The forms themselves appear nearly identical, so please select carefully, as the options available to you are limited in each.
The fields in the form ask for the basic information about the event/meeting. The one place that requires some getting used to is the “Add a Meeting” section.
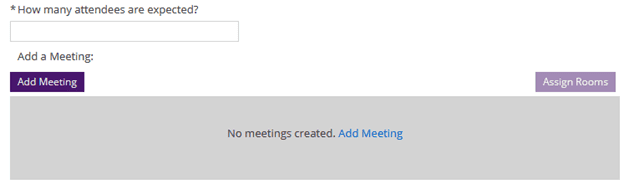
Click the purple “Add Meeting” button to bring up the “Create Meeting(s)” window.

This is a trimmed down version of the window on the scheduling grid view. Here you are only selecting the start/end times/dates and naming the meeting.
Once you click “Add Meeting” with all the required information included, the gray box on the form will fill with information about your meeting and the “Assign Rooms” button becomes available.

The “Assign Room” will open when you click the “Assign Rooms” button, and the rooms that show on this list are the available rooms as determined by which form you select:
- Event Request Form: With Resource Request – all rooms on campus are shown in the list
- Non-Conference Room Booking Request Form – you will not see conference rooms that can be directly booked in the list
You can click on the “Room” column to sort by name. If you can directly book the room it will say “Available,” and if you need to request the room, it will say “Available (Request).”
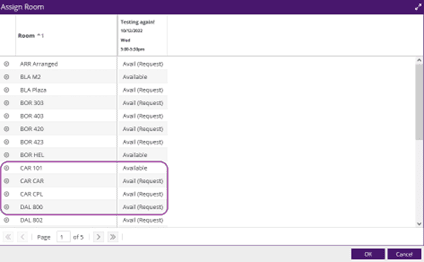
Click on the room you would like, and the “Available” status will change to “selected” and the box will turn green.

Once you have selected your room for your meeting and answered all the other questions in the form, click the submit button at the bottom.
From here, the appropriate staff members will be notified of the requests. If there are any questions or concerns with the request, you will be notified by email.
Exploring Ad Astra
There are many many other functions and capabilities in Ad Astra that we are continuing to develop and refine. As these features become finalized/available, we will send out notifications to campus.
This guide is meant as a starting point. Please feel free to explore the capabilities in Ad Astra and let us know if there are features you would like to see. We will explore every opportunity to make the most of this tool.